Fault Tolerance with Spring Data and YugabyteDB
Are you struggling with performance issues in your Spring, Jakarta EE, or Java EE application?
Imagine having a tool that could automatically detect performance issues in your JPA and Hibernate data access layer long before pushing a problematic change into production!
With the widespread adoption of AI agents generating code in a heartbeat, having such a tool that can watch your back and prevent performance issues during development, long before they affect production systems, can save your company a lot of money and make you a hero!
Hypersistence Optimizer is that tool, and it works with Spring Boot, Spring Framework, Jakarta EE, Java EE, Quarkus, Micronaut, or Play Framework.
So, rather than allowing performance issues to annoy your customers, you are better off preventing those issues using Hypersistence Optimizer and enjoying spending your time on the things that you love!
Introduction
In this article, we are going to see how we can achieve fault tolerance in your Spring Data application with the help of YugabyteDB.
As previously explained, YugabyteDB is an open-source distributed SQL database that combines the benefits of traditional relational databases with the advantages of globally-distributed auto-sharded database systems.
Fault tolerance
First, let’s start with the definition of Fault Tolerance, as provided by Wikipedia:
Fault tolerance is the property that enables a system to continue operating properly in the event of the failure of one or more faults within some of its components.
For a Spring Data application, fault tolerance can be achieved if the application nodes can still serve requests even if a database node has crashed.
Traditionally, fault tolerance was achieved using database replication:

In a Single-Primary database replication scheme, there is just one Primary node that accepts modifications, and all the other nodes are Replicas because they replicate the transactions that are executed on the Primary node. If the Primary node crashed due to a hardware or software failure, a Replica node could be promoted as the next Primary.
Another advantage of having a distributed system of database nodes is that we have more resources to serve user requests than if we used a single database instance. Therefore, database replication can also help us scale horizontally.
As already mentioned, YugabyteDB is a distributed SQL database, meaning it was designed to work as a distributed system of database nodes.
One advantage of being a distributed SQL database is that it can automatically scale read-write transactions to more than just one node.
For more details about scaling your Spring application with YugabyteDB, check out this article.
Creating a fault-tolerant YugabyteDB cluster
As you will soon see, creating a fault-tolerant YugabyteDB cluster is straightforward.
First, we will create a Docker network for our YugabyteDB cluster:
docker network create yugabyte-network
Afterward, we will create the first YugabyteDB node:
docker run -d --name yugabyte-replica1 --net=yugabyte-network ^
 -p7001:7000 -p9000:9000 -p5433:5433 ^
 yugabytedb/yugabyte:latest bin/yugabyted start ^
 --base_dir=/tmp/yugabyte ^
 --daemon=false
In my case, I used the
^Windows bash operator to specify that the current bash command continues on the next line.If you’re using Linux or Mac OS, then replace
^with a\bash operator.
After creating the first node, we can add two more nodes so that we will end up with a three-node cluster:
docker run -d --name yugabyte-replica2 --net=yugabyte-network ^
 yugabytedb/yugabyte:latest bin/yugabyted start ^
 --base_dir=/tmp/yugabyte ^
 --join=yugabyte-replica1 ^
 --daemon=false

docker run -d --name yugabyte-replica3 --net=yugabyte-network ^
 yugabytedb/yugabyte:latest bin/yugabyted start ^
 --base_dir=/tmp/yugabyte ^
 --join=yugabyte-replica1 ^
 --daemon=false
That’s it!
To visualize the YugabyteDB cluster, we can open the YugabyteDB Admin web server UI. In our case, because we provided the -p7001:7000 parameter when creating the yugabyte-replica1 Docker container, we can access the YugabyteDB Admin on localhost:7001, which looks like this:

Notice that the Replication Factor is 3, meaning that data is shared on all 3 nodes of our database cluster. If one node stores the primary copy of a record, the other two nodes will keep a copy of that record.
Connecting to the fault-tolerant YugabyteDB cluster
In our Spring Data application, we need to configure the JDBC Driver properly in order to enable fault tolerance.
For YugabyteDB, we can use the YBClusterAwareDataSource JDBC Driver because it can provide us with load balancing and fault tolerance, as illustrated by the following configuration:
YBClusterAwareDataSource dataSource = new YBClusterAwareDataSource();
dataSource.setURL(
    String.format(
        "jdbc:yugabytedb://%s:%d/%s",
        host,
        port,
        database
    );
);
dataSource.setUser(username());
dataSource.setPassword(password());
dataSource.setLoadBalanceHosts(true);
dataSource.setConnectTimeout(10);
dataSource.setSocketTimeout(10);
By enabling the loadBalanceHosts property, we instruct the YugabyteDB JDBC Driver to choose the database nodes randomly.
The connectTimeout and socketTimeout settings we’ve set instruct the YugabyteDB JDBC Driver to time out the connection acquisition, or the socket read operation after 10 seconds of inactivity.
When the connectTimeout threshold is reached, the JDBC Driver will throw a java.sql.SQLException: Connection is closed, and when the socketTimeout threshold is reached, the JDBC Driver will throw a SocketTimeoutException.
Now, because these exceptions are recoverable when using a YugabyteDB cluster, we don’t want to pass them to the service method caller. Instead, we want to retry the current method several times to give a chance to the YugabyteDB JDBC Driver to establish a new connection to a database node that can serve our request.
Retrying recoverable transactions
To retry the service method execution, we can use the @Retry annotation from the Hypersistence Utils project.
First, we need to add the Hypersistence Utils dependency. For Hibernate 6, we can use the
<dependency>
    <groupId>io.hypersistence</groupId>
    <artifactId>hypersistence-utils-hibernate-60</artifactId>
    <version>${hypersistence-utils.version}</version>
</dependency>
Afterward, we need to add the io.hypersistence.utils.spring.aop package to the Spring @ComponentScan configuration:
@ComponentScan(
    value = {
        "com.vladmihalcea.book.hpjp.spring.batch.service",
        "io.hypersistence.utils.spring.aop"
    }
)
And we add the following @Retry annotation to our findById service method:
@Retry(
    times = 3,
    on = {
        SocketTimeoutException.class,
        TransactionSystemException.class
    }
)
public Post findById(Long id) {
    return postRepository.findById(id).orElse(null);
}
In this case, the @Retry annotation specifies that the findById method execution will be retried up to 3 times in case the underlying RetryAspect catches an Exception that was triggered due to the JDBC SocketTimeoutException or the Spring TransactionSystemException that will wrap the SQLException("Connection is closed").
Testing time
To see how the cluster works when crashing a database node, we are going to run the following test case:
long startNanos = System.nanoTime();
long endNanos = startNanos +
    TimeUnit.SECONDS.toNanos(
        threadExecutionSeconds
    );

CountDownLatch awaitTermination = new CountDownLatch(threadCount);
List<Callable<Void>> tasks = new ArrayList<>();

ThreadLocalRandom random = ThreadLocalRandom.current();

final AtomicBoolean failed = new AtomicBoolean();

for (int i = 0; i < threadCount; i++) {
    tasks.add(
        () -> {
            while (!failed.get() && endNanos > System.nanoTime()) {
                try {
                    Long id = random.nextLong(1, POST_COUNT);
                    LOGGER.info("Fetching entity by id [{}]", id);
                    Post post = forumService.findById(id);
                    assertNotNull(post);

                    sleep(250, TimeUnit.MILLISECONDS);
                } catch (Exception e) {
                    failed.set(true);
                }
            }
            awaitTermination.countDown();
            return null;
        }
    );
}

executorService.invokeAll(tasks);
awaitTermination.await();
assertFalse(failed.get());
The test case runs a number of threads that fetch a given post record for a given period of time. Notice that the test case would fail if any of the threads calling the findById method caught an Exception.
If the retry mechanism works as expected, then the connection failure should not be bubbled up to the caller.
When running the test case, we need to make sure the YBClusterAwareDataSource instance runs in the same yugabyte-network Docker network as the YugabyteDB cluster.
If you are using IntelliJ IDEA and want to run the JUnit test case, then you’ll need to run it in a Docker container that configures the network explicitly.
You can do that as illustrated by the following screen capture:

The YugabyteDB Network IntelliJ IDEA target was configured as follows:
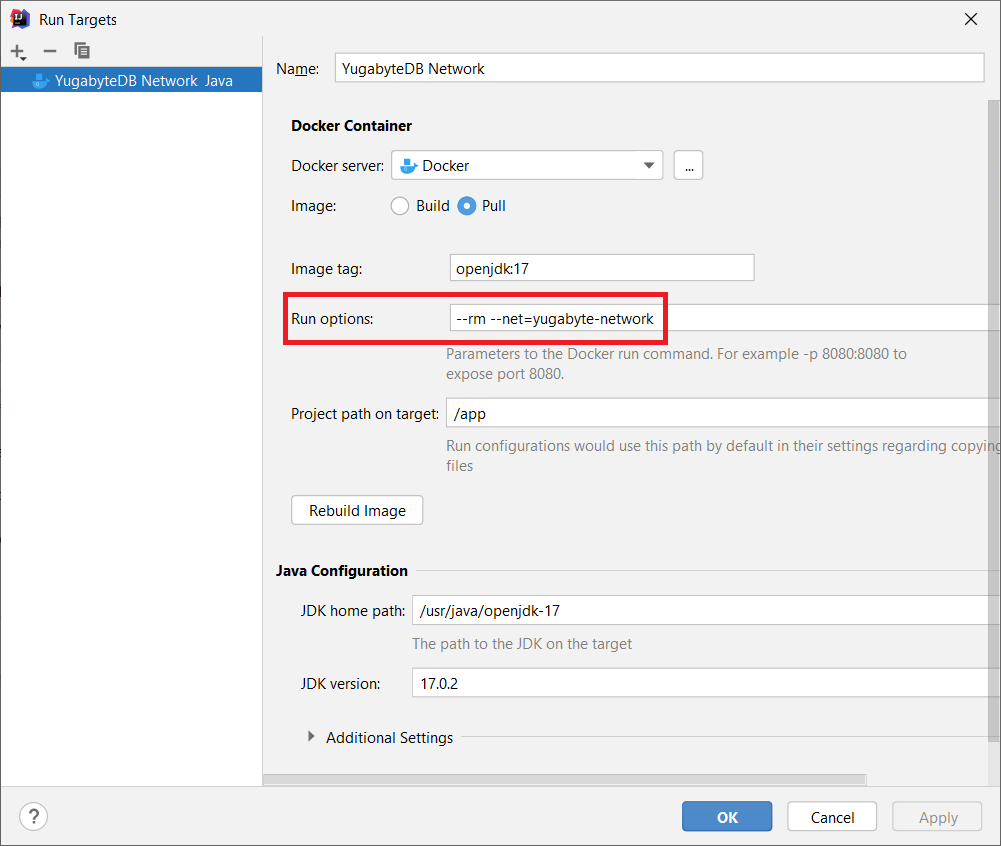
Notice that we set the yugabyte-network Docker network so that the test case will run in the same Docker network as the YugabyteDB cluster.
When starting the SpringBatchYugabyteDBTest, we can see that it works as expected:
18:24:28,746 INFO  [pool-1-thread-1]: SpringBatchYugabyteDBTest - Fetching entity by id [415]
18:24:28,750 INFO  [pool-1-thread-2]: SpringBatchYugabyteDBTest - Fetching entity by id [958]
18:24:28,757 INFO  [pool-1-thread-3]: SpringBatchYugabyteDBTest - Fetching entity by id [66]
18:24:28,757 INFO  [pool-1-thread-4]: SpringBatchYugabyteDBTest - Fetching entity by id [727]
18:24:28,758 INFO  [pool-1-thread-5]: SpringBatchYugabyteDBTest - Fetching entity by id [356]
18:24:28,766 INFO  [pool-1-thread-6]: SpringBatchYugabyteDBTest - Fetching entity by id [91]
18:24:29,481 INFO  [pool-1-thread-5]: SpringBatchYugabyteDBTest - Fetching entity by id [58]
18:24:29,492 INFO  [pool-1-thread-3]: SpringBatchYugabyteDBTest - Fetching entity by id [42]
18:24:29,500 INFO  [pool-1-thread-1]: SpringBatchYugabyteDBTest - Fetching entity by id [594]
During the test execution, we are going to stop the yugabyte-replica3 Docker container that runs the third database node in our cluster:
docker stop yugabyte-replica3
If we go to the application log and we filter by one of the running threads (e.g., pool-1-thread-5), we will see the following entries:
18:24:35,845 INFO  [pool-1-thread-5]: SpringBatchYugabyteDBTest - Fetching entity by id [590]
18:24:36,105 INFO  [pool-1-thread-5]: SpringBatchYugabyteDBTest - Fetching entity by id [711]
18:24:46,118 WARN  [pool-1-thread-5]: ProxyConnection - HikariPool-1 -
                    Connection com.yugabyte.jdbc.PgConnection@74b52462 marked as broken
                    because of SQLSTATE(08006), ErrorCode(0)
18:24:46,122 WARN  [pool-1-thread-5]: SqlExceptionHelper -
                    SQL Error: 0, SQLState: 08006
18:24:46,123 ERROR [pool-1-thread-5]: SqlExceptionHelper -
                    An I/O error occurred while sending to the backend.
18:24:46,125 INFO  [pool-1-thread-5]: DefaultLoadEventListener -
                    HHH000327: Error performing load command
18:24:46,128 ERROR [pool-1-thread-5]: TransactionInterceptor -
                    Application exception overridden by rollback exception
                    Caused by: org.hibernate.exception.JDBCConnectionException:
                        JDBC exception executing SQL [
                            select
                                p1_0.id,p1_0.status,p1_0.title
                            from
                                post p1_0
                            where
                                p1_0.id=?
                        ]
                    Caused by: com.yugabyte.util.PSQLException:
                        An I/O error occurred while sending to the backend.
                    Caused by: java.net.SocketTimeoutException: Read timed out
18:24:46,130 INFO  [pool-1-thread-5]: RetryAspect -
                    Retryable failure was caught, 2 remaining retries on [
                        class java.net.SocketTimeoutException,
                        class org.springframework.transaction.TransactionSystemException
                    ]
18:24:51,950 INFO  [pool-1-thread-5]: SpringBatchYugabyteDBTest - Fetching entity by id [157]
18:24:52,210 INFO  [pool-1-thread-5]: SpringBatchYugabyteDBTest - Fetching entity by id [620]
Notice that between 18:24:36,105 and 18:24:46,118, there are 10 seconds of inactivity because the Thread was waiting to get a response from the database node that we have stopped. The 10-second threshold is the one we’ve set using the connectTimeout and socketTimeout JDBC Driver properties.
Next, you can see that the RetryAspect caught the SocketTimeoutException and decided to rerun the findById method call instead of throwing the exception to the service method caller.
And since the YugabyeDB cluster has recovered from the node failure, in the following pool-1-thread-5 log entries, we can see that the record is successfully fetched.
Thanks to the @Retry annotation and the RetryAspect from the Hypersistence Utils project, the node failure does not affect application availability at all since the service method is retried after the recoverable failure is detected.
Cool, right?
If you enjoyed this article, I bet you are going to love my Book and Video Courses as well.


Conclusion
Not only that the YugabyteDB cluster makes it easier to scale a Spring application, but we can also benefit from automatic fault tolerance.
With YugabyteDB, enabling fault tolerance is just a matter of running a multi-node cluster and setting the connection and socket timeout threshold at the Driver level.
This research was funded by Yugabyte and conducted in accordance with the blog ethics policy.
While the article was written independently and reflects entirely my opinions and conclusions, the amount of work involved in making this article happen was compensated by Yugabyte.