The best way to use the Spring Transactional annotation
Are you struggling with performance issues in your Spring, Jakarta EE, or Java EE application?
Imagine having a tool that could automatically detect performance issues in your JPA and Hibernate data access layer long before pushing a problematic change into production!
With the widespread adoption of AI agents generating code in a heartbeat, having such a tool that can watch your back and prevent performance issues during development, long before they affect production systems, can save your company a lot of money and make you a hero!
Hypersistence Optimizer is that tool, and it works with Spring Boot, Spring Framework, Jakarta EE, Java EE, Quarkus, Micronaut, or Play Framework.
So, rather than allowing performance issues to annoy your customers, you are better off preventing those issues using Hypersistence Optimizer and enjoying spending your time on the things that you love!
Introduction
In this article, I’m going to show you the best way to use the Spring Transactional annotation.
This is one of the best practices I applied when developing RevoGain, a web application that allows you to calculate the gains you realized while trading stocks, commodities, or crypto using Revolut.
Spring Transactional annotation
Right from the 1.0 version, Spring offered support for AOP-based transaction management that allowed developers to define the transaction boundaries declaratively. I know this because I was reading its manual in the autumn of 2004:
The reason why I started using @springframework in 2004 is because of its manual written by @springrod and the team. I was sold right away.
— Vlad Mihalcea (@vlad_mihalcea) February 17, 2021
Never underestimate the impact of documentation.
https://t.co/fpJsn2F1sA pic.twitter.com/Dmgnsir1bT
Very soon after, in the 1.2 version, Spring added support for the @Transactional annotation, which made it even easier to configure the transaction boundaries of business units of work.
The @Transactional annotation provides the following attributes:
valueandtransactionManager– these attributes can be used to provide aTransactionManagerreference to be used when handling the transaction for the annotated blockpropagation– defines how the transaction boundaries propagate to other methods that will be called either directly or indirectly from within the annotated block. The default propagation isREQUIREDand means that a transaction is started if no transaction is already available. Otherwise, the in-progress transaction is going to be used by the current running method.timeoutandtimeoutString– define the maximum number of seconds the current method is allowed to run before throwing aTransactionTimedOutExceptionreadOnly– defines if the current transaction is read-only or read-write.rollbackForandrollbackForClassName– define one or moreThrowableclasses for which the current transaction will be rolled back. By default, a transaction is rolled back if aRuntimExceptionor anErroris thrown, but not if it throws a checkedException.noRollbackForandnoRollbackForClassName– define one or moreThrowableclasses for which the current transaction will not be rolled back. Normally, you’d use these attributes for one or moreRuntimExceptionclasses for which you don’t want to roll back a given transaction.
What layer does the Spring Transactional annotation belong to?
The @Transactional annotation belongs to the Service layer because it is the Service layer’s responsibility to define the transaction boundaries.
Don’t use it in the Web layer because this can increase the database transaction response time and make it more difficult to provide the right error message for a given database transaction error (e.g., consistency, deadlock, lock acquisition, optimistic locking).
The DAO (Data Access Object) or Repository layer requires an application-level transaction, but this transaction should propagate from the Service layer.
The best way to use the Spring Transactional annotation
In the Service layer, you can have both database-related and non-database-related services. If a given business use case needs to mix them, like when it has to parse a given statement, build a report, and save some results to the database, it’s best if the database transaction is started as late as possible.
For this reason, you could have a non-transactional gateway service, like the following RevolutStatementService:
@Service
public class RevolutStatementService {
⠀
    @Transactional(propagation = Propagation.NEVER)
    public TradeGainReport processRevolutStocksStatement(
            MultipartFile inputFile,
            ReportGenerationSettings reportGenerationSettings) {
        return processRevolutStatement(
            inputFile,
            reportGenerationSettings,
            stocksStatementParser
        );
    }
⠀
    private TradeGainReport processRevolutStatement(
            MultipartFile inputFile,
            ReportGenerationSettings reportGenerationSettings,
            StatementParser statementParser
    ) {
        ReportType reportType = reportGenerationSettings.getReportType();
        String statementFileName = inputFile.getOriginalFilename();
        long statementFileSize = inputFile.getSize();
⠀
        StatementOperationModel statementModel = statementParser.parse(
            inputFile,
            reportGenerationSettings.getFxCurrency()
        );
        int statementChecksum = statementModel.getStatementChecksum();
        TradeGainReport report = generateReport(statementModel);
⠀
        if(!operationService.addStatementReportOperation(
            statementFileName,
            statementFileSize,
            statementChecksum,
            reportType.toOperationType()
        )) {
            triggerInsufficientCreditsFailure(report);
        }
⠀
        return report;
    }
}
The processRevolutStocksStatement method is non-transactional, and, for this reason, we can use the Propagation.NEVER strategy to make sure that this method is never ever called from an active transaction.
The statementParser.parse and the generateReport method are, therefore, executed in a non-transactional context as we don’t want to acquire a database connection and hold it necessarily when we only have to execute application-level processing.
Only the operationService.addStatementReportOperation requires to execute in a transactional context, and for this reason, the addStatementReportOperation uses the @Transactional annotation:
@Service
@Transactional(readOnly = true)
public class OperationService {
⠀
    @Transactional(isolation = Isolation.SERIALIZABLE)
    public boolean addStatementReportOperation(
        String statementFileName,
        long statementFileSize,
        int statementChecksum,
        OperationType reportType) {
⠀
        ...
    }
}
Note that the addStatementReportOperation overrides the default isolation level and specifies that this method is executed in a SERIALIZABLE database transaction.
Another thing worth noting is that the class is annotated with @Transactional(readOnly = true), meaning that, by default, all service methods will use this setting and execute in a read-only transaction unless the method overrides the transactional settings using its own @Transactional definition.
For transactional services, it’s good practice to set the readOnly attribute to true at the class level and override it on a per-method basis for the service methods that need to write to the database.
For instance, the UserService uses the same pattern:
@Service
@Transactional(readOnly = true)
public class UserService implements UserDetailsService {
⠀
    @Override
    public UserDetails loadUserByUsername(String username)
        throws UsernameNotFoundException {
        ...
    }
⠀
    @Transactional
    public void createUser(User user) {
        ...
    }
}
The loadUserByUsername uses a read-only transaction, and since we are using Hibernate, Spring performs some read-only optimizations as well.
On the other hand, the createUser has to write to the database. Hence, it overrides the readOnly attribute value with the default setting given by the @Transactional annotation, which is readOnly=false, therefore making the transaction read-write.
Another great advantage of splitting read-write and read-only methods is that we can route them to different database nodes, as explained in this article.
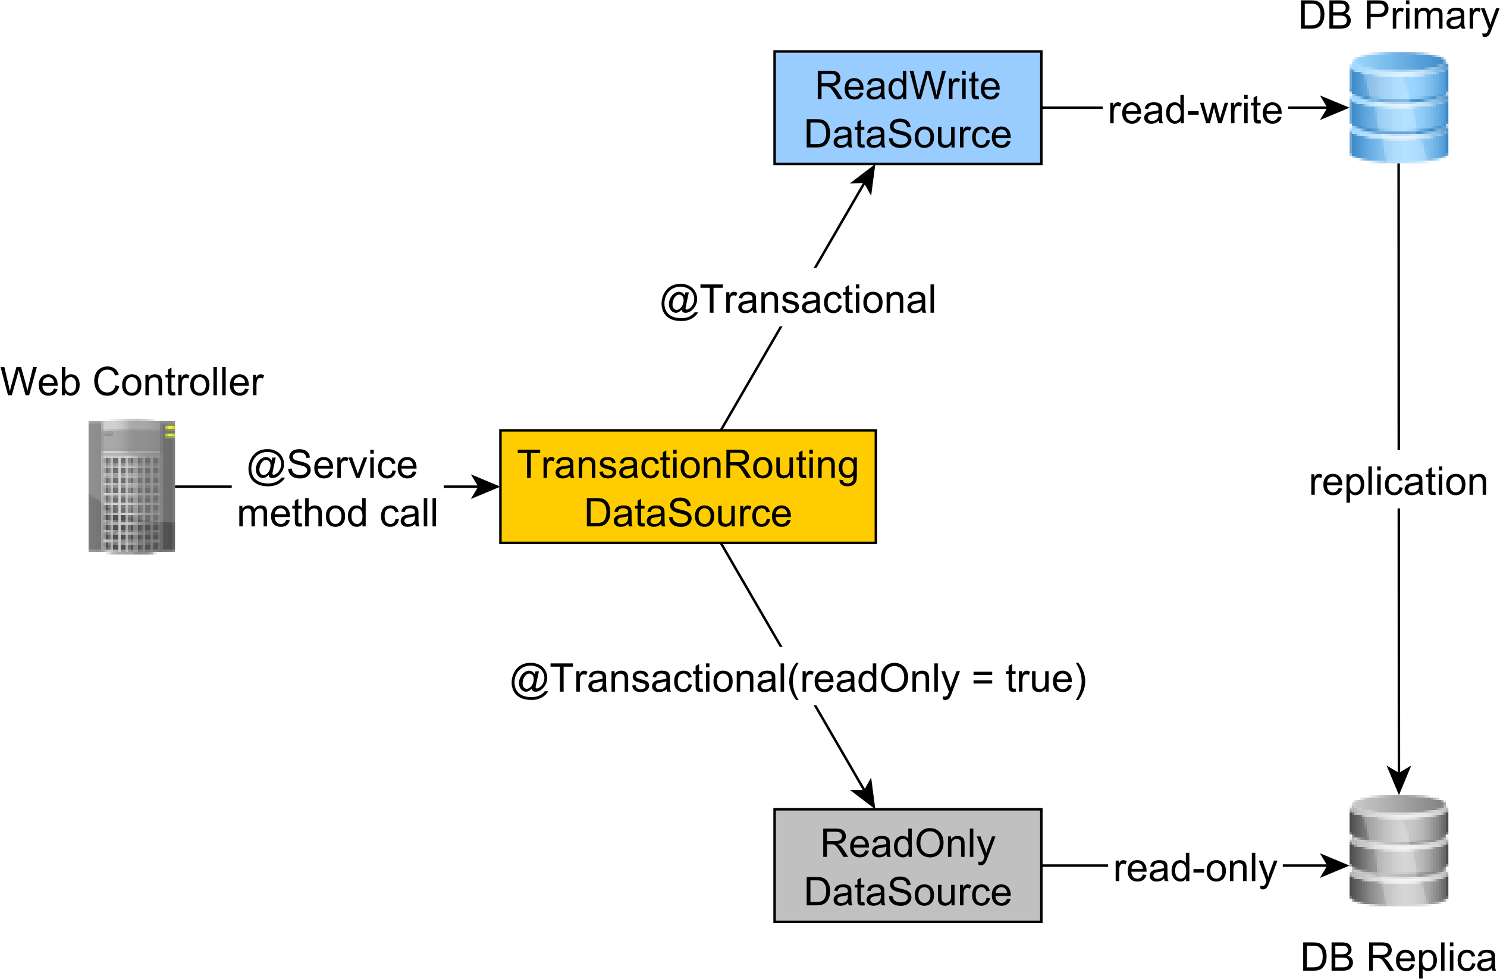
This way, we can scale read-only traffic by increasing the number of replica nodes.
Awesome, right?
If you enjoyed this article, I bet you are going to love my Book and Video Courses as well.


Conclusion
The Spring Transactional annotation is very handy when it comes to defining the transaction boundaries of business methods.
While the default attribute values were properly chosen, it’s good practice to provide both class-level and method-level settings to split use cases between non-transactional, transactional, read-only, and read-write use cases.


I know what is Spring @Transactional and why to use it, but have slight doubt concerning @Transactional(readOnly = true).
Should I use @Transactional(readOnly = true) for the code that only read data from database? As read Spring will apply some optimizations when it is applied.
I believe it has to be added only in the case when we mix write and read on same database. Just to make sure that the data we started to read hasn’t been changed in meantime for example if other application modifies the data.
Yes.
Data always changes. You always operate on point-in-time snapshots. Consistency and Linearizability is achieved at write time. For example, optimistic locking can prevent the lost update phenomenon even if someone else has changed the data since you read it.