How to tunnel localhost to the public Internet
Are you struggling with performance issues in your Spring, Jakarta EE, or Java EE application?
Imagine having a tool that could automatically detect performance issues in your JPA and Hibernate data access layer long before pushing a problematic change into production!
With the widespread adoption of AI agents generating code in a heartbeat, having such a tool that can watch your back and prevent performance issues during development, long before they affect production systems, can save your company a lot of money and make you a hero!
Hypersistence Optimizer is that tool, and it works with Spring Boot, Spring Framework, Jakarta EE, Java EE, Quarkus, Micronaut, or Play Framework.
So, rather than allowing performance issues to annoy your customers, you are better off preventing those issues using Hypersistence Optimizer and enjoying spending your time on the things that you love!
Introduction
In this article, I’m going to show you how you can tunnel your localhost environment to a public Internet address that can be accessed by other services you are using for testing.
Why tunnel localhost to a public Internet address?
If you are optimizing the front-end of a given web application and want to see how effective your changes are, you can use a tool like GT Metrix or Pingdom Website Testing.
The problem is that those tools can access only a public Internet address, not your localhost environment. And, while you can deploy your temporary changes to a QA environment that’s publicly accessible, there’s a much simpler way to achieve this goal.
Or, while developing RevoGain, the most awesome Revolut trading grain calculator, I had to test the FastSpring payment integration. The payment callbacks need a public Internet address that FastSpring calls after making a purchase. To test the integration, you’d need to expose your localhost environment to a public Internet address so that FastSpring can call your own environment.
And, the solution to this problem is to open a networking tunnel between localhost and some public Internet address all those services can access.
Networking tunnel
In networking, a tunnel allows you to transport packets from a private network to a public network. For instance, tunneling is used with VPN (virtual private networks) to secure network connections.
The Linux ssh port forwarding is also using another example of a networking tunnel, which allows you to transport packets securely from your localhost environment to a public network.
Ngrok
While there are many ways to create a networking tunnel, my favorite tool is Ngrok. After I downloaded the tool, I created a tunnel.bat script that’s available on the Windows PATH:
@echo off

call ngrok http %*
To open an HTTP or HTTPS tunnel, all I have to do is run the following command:
tunnel 8080
ngrok by @inconshreveable
Session Status online
Version 2.3.40
Region United States (us)
Web Interface http://127.0.0.1:4040
Forwarding http://956e-188-24-86-235.ngrok.io 🡒 http://localhost:8080
Forwarding https://956e-188-24-86-235.ngrok.io 🡒 http://localhost:808
Connections ttl opn rt1 rt5 p50 p90
0 0 0.00 0.00 0.00 0.00
That’s it!
Now, localhost:8080 is available at the 246d-188-24-86-235.ngrok.io address. And the 246d-188-24-86-235.ngrok.io uses an HTTPS tunnel to my localhost environment.
Testing time
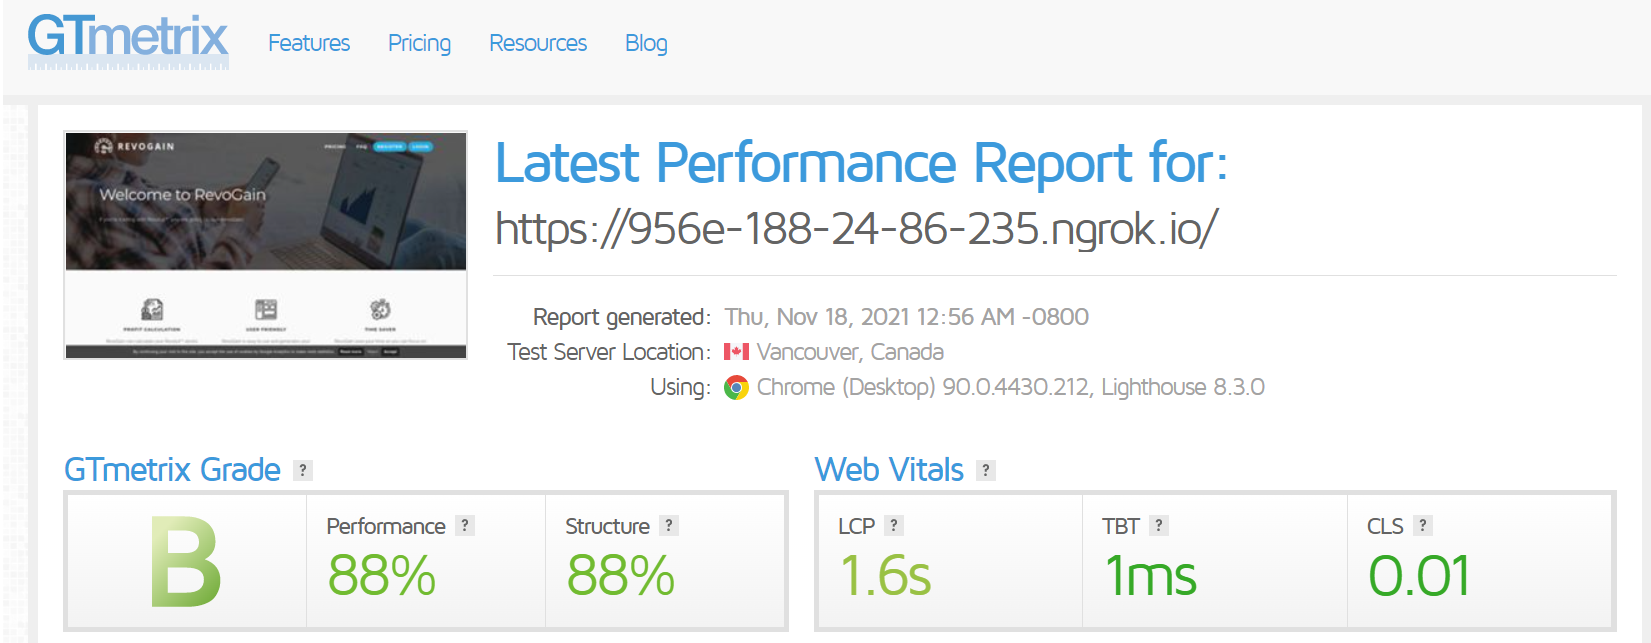
To test how well the front-end performs, I now can use GT Metrix to analyze the Spring Boot server running on my localhost environment:
When going to the NGrok command line window, I can see various metrics about the networking connections established via the tunnel:
Connections     ttl     opn     rt1     rt5     p50     p90
                24      0       0.00    0.01    0.24    32.28
Awesome, right?
If you enjoyed this article, I bet you are going to love my Book and Video Courses as well.


Conclusion
Exposing your localhost environment to a public Internet address is a very handy feature when testing a web application.
NGrok is a very simple tool that allows you to create a networking tunnel between your private web server and a public Internet address.