How to extract change data events from MySQL to Kafka using Debezium
Imagine having a tool that can automatically detect JPA and Hibernate performance issues. Wouldn’t that be just awesome?
Well, Hypersistence Optimizer is that tool! And it works with Spring Boot, Spring Framework, Jakarta EE, Java EE, Quarkus, or Play Framework.
So, enjoy spending your time on the things you love rather than fixing performance issues in your production system on a Saturday night!
Introduction
As previously explained, CDC (Change Data Capture) is one of the best ways to interconnect an OLTP database system with other systems like Data Warehouse, Caches, Spark or Hadoop.
Debezium is an open-source project developed by Red Hat which aims to simplify this process by allowing you to extract changes from various database systems (e.g. MySQL, PostgreSQL, MongoDB) and push them to Apache Kafka.
In this article, we are going to see how you can extract events from MySQL binary logs using Debezium.
Debezium Architecture
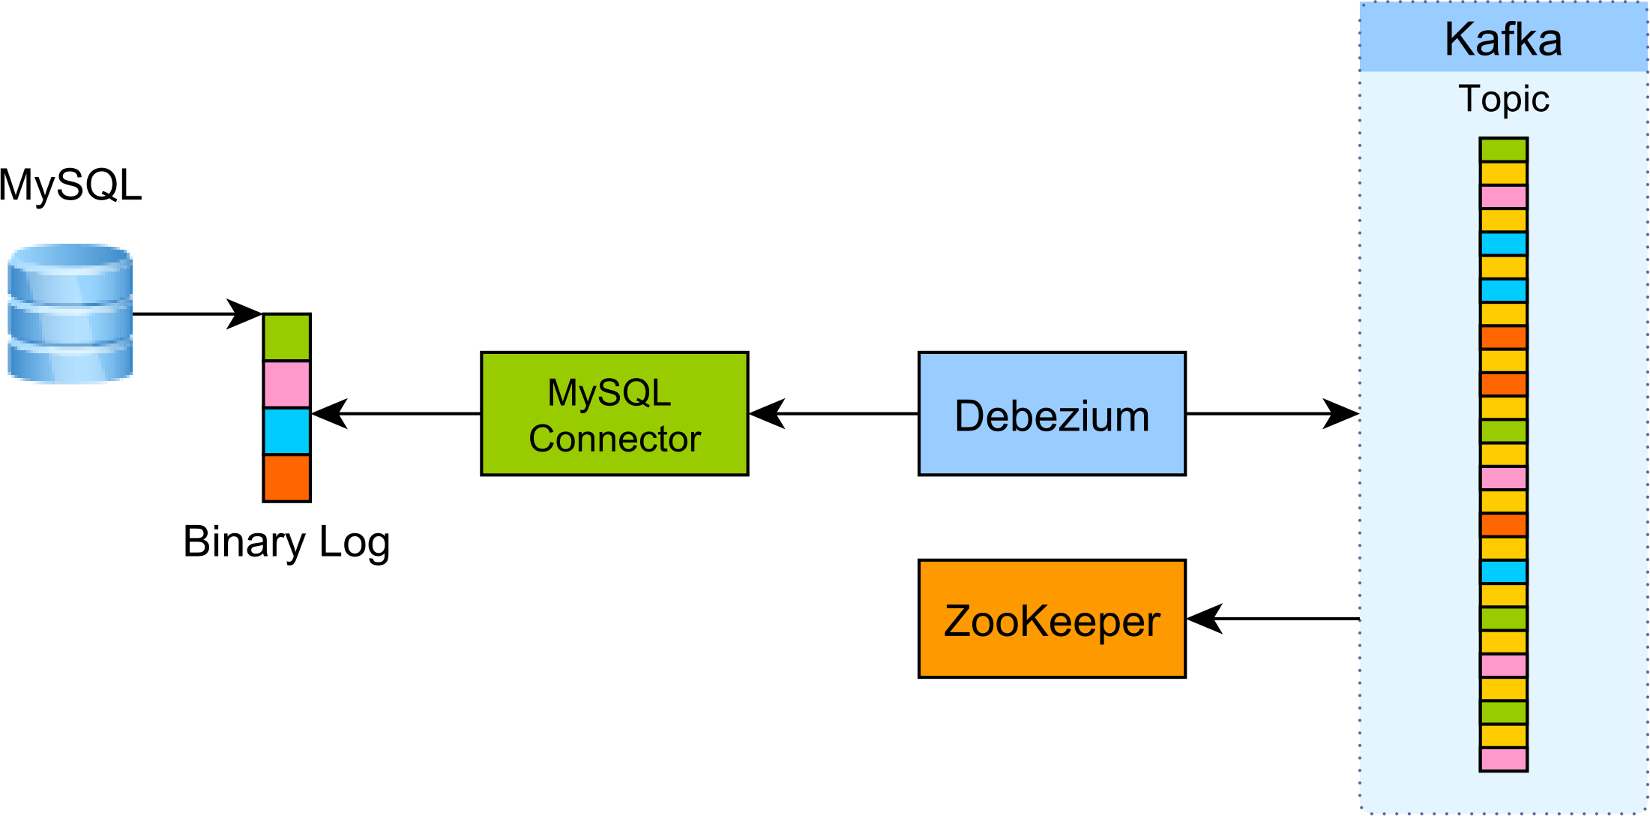
First, you need a database-specific Debezium connector to be able to extract the Redo Log (e.g. Oracle), Binary Log (e.g. MySQL), or Write-Ahead Logs (e.g. PostgreSQL).
You also need to have Kafka running so that you can push the extracted log events and make them available to other services in your enterprise system. Apache ZooKeeper is not needed by Debezium, but by Kafka since it relies on it for consensus as well as linearizability guarantees.
Installing Debezium
If you want to give Debezium a try, you can follow this very extensive tutorial offered in the Debezium documentation section.
Basically, you have to run the following Docker containers:
> docker run -it --name zookeeper -p 2181:2181 -p 2888:2888 -p 3888:3888 debezium/zookeeper:0.5

> docker run -it --name kafka -p 9092:9092 --link zookeeper:zookeeper debezium/kafka:0.5

> docker run -it --name mysql -p 3306:3306 -e MYSQL_ROOT_PASSWORD=debezium -e MYSQL_USER=mysqluser -e MYSQL_PASSWORD=mysqlpw debezium/example-mysql:0.5

> docker run -it --name kafka-connect -p 8083:8083 -e GROUP_ID=1 -e CONFIG_STORAGE_TOPIC=my_connect_configs -e OFFSET_STORAGE_TOPIC=my_connect_offsets --link zookeeper:zookeeper --link kafka:kafka --link mysql:mysql debezium/connect:0.5

> docker run -it --name kafka-watcher --link zookeeper:zookeeper debezium/kafka:0.5 watch-topic -a -k dbserver1.inventory.customers
Afterward, you should have the following containers listed by Docker:
> docker ps -a

CONTAINER ID        IMAGE                          NAMES
bbfeafd9125c        debezium/kafka:0.5             kafka-watcher
4cfffedae69c        debezium/connect:0.5           kafka-connect
36734bc82864        debezium/example-mysql:0.5     mysql
daaaab6f3206        debezium/kafka:0.5             kafka
8a7affd3e2a4        debezium/zookeeper:0.5         zookeeper
Using bash, you need to create a new connector:
curl -i -X POST ^
 -H "Accept:application/json" ^
 -H "Content-Type:application/json" ^
 localhost:8083/connectors/ ^
 -d '{ "name": "inventory-connector", "config": { "connector.class": "io.debezium.connector.mysql.MySqlConnector", "tasks.max": "1", "database.hostname": "mysql", "database.port": "3306", "database.user": "debezium", "database.password": "dbz", "database.server.id": "184054", "database.server.name": "dbserver1", "database.whitelist": "inventory", "database.history.kafka.bootstrap.servers": "kafka:9092", "database.history.kafka.topic": "dbhistory.inventory" } }'
Notice that kafka-watcher was started in interactive mode so that we can see in the console the CDC log events captured by Debezium.
Testing time
Now, if we connect to the MySQL Docker container using the root user and the debezium password, we can issue various SQL statements and inspect the kafka-watcher container console output.
INSERT
When inserting a new customer row:
INSERT INTO `inventory`.`customers`
(
    `first_name`,
    `last_name`,
    `email`)
VALUES
(
    'Vlad',
    'Mihalcea',
    'vlad@acme.org'
)
In the kafka-watcher, we can now find the following JSON entry:
{
   "payload":{
      "before":null,
      "after":{
         "id":1005,
         "first_name":"Vlad",
         "last_name":"Mihalcea",
         "email":"vlad@acme.org"
      },
      "source":{
         "name":"dbserver1",
         "server_id":223344,
         "ts_sec":1500369632,
         "gtid":null,
         "file":"mysql-bin.000003",
         "pos":364,
         "row":0,
         "snapshot":null,
         "thread":13,
         "db":"inventory",
         "table":"customers"
      },
      "op":"c",
      "ts_ms":1500369632095
   }
}
The before object is null while the after object shows the newly inserted value. Notice that the op attribute value is c, meaning it’s a CREATE event.
UPDATE
When updating the customer row:
UPDATE `inventory`.`customers`
SET
    `email` = 'vlad.mihalcea@acme.org'
WHERE
    `id` = 1005
We can now find the following log event:
{
    "payload":{
      "before":{
         "id":1005,
         "first_name":"Vlad",
         "last_name":"Mihalcea",
         "email":"vlad@acme.org"
      },
      "after":{
         "id":1005,
         "first_name":"Vlad",
         "last_name":"Mihalcea",
         "email":"vlad.mihalcea@acme.org"
      },
      "source":{
         "name":"dbserver1",
         "server_id":223344,
         "ts_sec":1500369929,
         "gtid":null,
         "file":"mysql-bin.000003",
         "pos":673,
         "row":0,
         "snapshot":null,
         "thread":13,
         "db":"inventory",
         "table":"customers"
      },
      "op":"u",
      "ts_ms":1500369929464
   }
}
The op attribute value is u, meaning we have an UPDATE log event. The before object shows the row state before the update while the after object captures the current state of the updated customer database row.
DELETE
When issuing a DELETE statement:
DELETE FROM `inventory`.`customers`
WHERE id = 1005;
The following event is being recorded by the kafka-connect Docker container:
{
    "payload":{
      "before":{
         "id":1005,
         "first_name":"Vlad",
         "last_name":"Mihalcea",
         "email":"vlad.mihalcea@acme.org"
      },
      "after":null,
      "source":{
         "name":"dbserver1",
         "server_id":223344,
         "ts_sec":1500370394,
         "gtid":null,
         "file":"mysql-bin.000003",
         "pos":1025,
         "row":0,
         "snapshot":null,
         "thread":13,
         "db":"inventory",
         "table":"customers"
      },
      "op":"d",
      "ts_ms":1500370394589
   }
}
The op attribute value is d, meaning we have a DELETE log event and the after object is now null. The before object captures the database row state before it got deleted.
Brilliant, right?
I'm running an online workshop on the 20-21 and 23-24 of November about High-Performance Java Persistence.

If you enjoyed this article, I bet you are going to love my Book and Video Courses as well.


Conclusion
Debezium is an awesome tool that you can use to interconnect your OLTP front-end systems with Apache Kafka which serves as the backbone of your enterprise system.
There are many more connectors planned to be developed, so stay tuned for updates and get involved as well.